This post is a long time coming. I made 30 pairs of Minnie Mouse ears for my daughter’s second birthday party back in March. When “designing” the ears, I looked all over the Internet for a good guide, but everything I found was too complicated or too simple. I wanted something reasonable, but super cute. So, as I created my own “design.” I detailed my process with pictures planning to share my Minnie Mouse Ears template. Unfortunately, everything else has taken precedence, and I am just now posting more than 3+ months since I made the ears. Oh well, better late than never! I hope you enjoy my guide, and if you make some, please share your pics and/or experiences!

- Headbands – look for about a 1/2 inch wide, any color because you are going to cover them. I like the flexible, fabric covered Goodie ones because they don’t break easily went bent.
- Black Felt – I purchased felt made out of 100% recycled water bottles, cheap and eco-friendly! (Don’t forget your 40% off coupon if shopping at Joann’s or Michael’s)
- Foam Sheets – I bought the ones with sticky on one side, it was helpful. There were 2 thicknesses at Joann’s I bought the thinner ones and doubled up. (Again, use your 40% off coupons for these and buy a bulk pack because color won’t matter.)
- Circle Tracer – I used a circle tracer from Scrapbooking materials I have, but you can use anything that you want to trace the right size. Circles approx 3 inches and 3.5 inches will be needed.
- Scissors – sharp enough to cut felt smoothly.
- Chalk pencil in white – to trace your shapes on the black felt to be cut out.
- Sharpe marker – to trace your circles on the foam to be cut out.
- Hot glue gun – LOTS of glue!
- Ribbon – This is for Minnie Mouse bows, so you can skip if all Mickey Mouse. You will need 1.5 inch pink polka dot ribbon for the bow and a thin 1/8 inch ribbon to tie it on with – preferably in the same color.
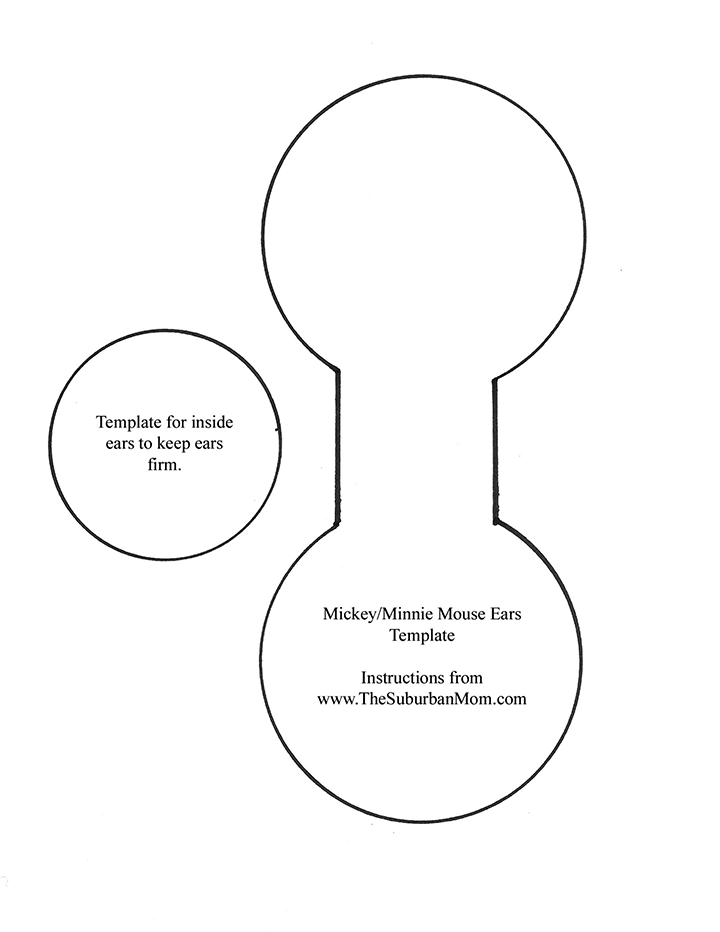
- Template – Download my template for your ears (Adobe PDF File).

How To Make Minnie Mouse Ears
Step 1 – Cover the headband – The dimensions used in this step vary based on the headbands purchased. You will basically need to measure enough felt to be wide enough to wrap the headband and long enough to close on either end. Roughly 2.25 the width of your headband and 1 inch longer then the length.
Since I am always nervous abut cutting fabric and wasting it, I recommend cutting 2 strips that you think will be the right size. Test one and use the other as a pattern for the rest of your strips, adjusting bigger or smaller if needed.


Step 2 – Cut foam circles – The foam circles will stiffen your felt ears so they stand up nice and firm on their own. Since you will totally cover your foam, any color works. I made my mouse ears 3.5 inches in diameter. This size works well for toddlers – adults, but you can adjust if you like. You will need 4 foam circles for each pair of ears – remembered I doubled my thin foam to make stiffer. The foam circles will be 3 inches in diameter.

If you purchased the thin foam with adhesive, go ahead and stick your foam circles together in pairs.


Step 4 – Create your ears – Once you have everything cut out, it is time to assemble your ears. (Note, cutting is the longest process, I cut all my pieces out over several days because if you are making 30 like I did, your hand will get tired!)
Starting with a foam circle (doubled), use the sticky side to attach to the center of one side of the felt ears. Next squirt a generous amount of hot glue all over the top of the foam circle and fold the other side on top. Again, squish as flat as you can. Note, in order to avoid large lumps you want really hot glue, yes, you will burn your fingers a bit 🙂 Sorry.
Go ahead and glue all of your ears. Be sure to leave the rectangle area unsealed (for now).
After your ears have cooled, go back and run a thin line of glue on the inside edge of each ear to seal. Again, not on the edge with the folded rectangle.

Step 6 – Minnie Bows – To create your bows, cut a length of ribbon approx 9 inches long. Fold the two ends back until they over lap in the center, and then pinch all three layers at the center. This creates the look of Minnie’s bow. Next take the thin ribbon (in matching color) and tie around the pinch at the center. Vola, a bow! Next wrap the thin ribbon around the top and bottom of the headband and tie off. Then glue the ribbon flaps down, and use a squirt of hot clue behind the bow to secure.

If you are having a Minnie Mouse (or Mickey Mouse) birthday party and want more ideas for party decor, check out my other post with details about all of the other fun decorations for a Minnie Mouse Birthday Party.

DIY Minnie Mickey Mouse Ears Video Tutorial
For even more tips, check out my video tutorial that will walk you step by step through the whole process.
Super cute. My kiddos love them. I next time they have them on I will take a pic for ya!
Thanks this is great! About to make some later today and these are the best instructions I’ve found 🙂
This is AMAZING! Love it! My party is on Monday so I don’t have time to do all of this–but i wish i found these instruction last week! Great craft!
Ive been searching on ideas on how to make minnie mouse ears for my daughters 2nd birthday party. This instructions are the best ones i have found and your steps are very easy to follow. the pictures were great too. I will definetly use your steps. thanks so much for posting.
Thanks for posting this!! It’s exactly what I’ve been looking for!! I don’t know if mine will be as cute but we’ll see =)
I’ve been searching for weeks for instructions to make the ears. I love them! Your instructions are clear and easy to follow. I’m having my daughter’s first birthday/adoption party in December. All the children will look so cute. Thank you for sharing!
Did you have a budget? How much did it cost to make everything?
Did you have a budget…about how much did it cost for the material and supplies to make the ears?
Good question Letitia – unfortunately, I didn’t save all receipts so I don’t have exact. But here’s an approx: Headbands – free (see above), felt $3, foam sheets $2-3, glue $4, ribbon $4-5 + $2 for the skinny ribbon, everything else I already had. And that was enough for 30 pairs. I was on a tight budget, so I deal hunted!
Hello I di`d not see yoy name written anywhere but I just wanted to thank you for this beaitiful step by step guide.
I going to celebrate on October my baby`s 1st year, an the theme is a Mickey Mouse Birhday party.
As you know It wouldn´t be the same without the ears.
As soon as I make all 20 I will ask you e-mail to send some pics.
You Idea is excelent the best option for me on the internet.
Thanks A Lot!
Tatnay fron Venezuela!
Thank for the step by step instructions. I am going to follow your directions. I was going to make some and had the exact idea, but I think I was going to put too much into it. I like your ideas better…I will post pics once we make them.
THIS IS AWESUM!
I am planning a Minnie Mouse themed party for my daugther’s second birthday as well. I would loved to see pictures and hear ideas you did at the party. By the way, loved the ears. I am gonna try and make them as well.
I make hair accessories and was wondering if the ribbon woven headband would work instead of covering it in felt? If not, that’s fine… the instructions are GREAT. My daughter’s 3rd birthday is in November so I should def have plenty of time to get all of this done. 🙂
I was also wondering if you had any tips for like goody bags or anything? Do you have any more pics to share? Sorry for all the questions. Thanks again for the tutorial…GREAT!
Thanks for taking the time to comment on my Minnie Mouse Ears post!
You certainly could do the ears with any type of headband. I actually planned to buy black headbands and just attach ears to them, but as it turned out I wasn’t able to find any plain black headbands for cheap. I ended up liking them covered b/c they were soft and totally matched, but you can totally alter to suit what you have/need.
As far as goodie bags and other pictures, you are actually the second person to ask me about that lately, and I guess I really didn’t post anything else… which is nutty as much time as I put into the party! LOL!
For her goodie bags, I purchased Minnie Mouse plates from the Disney store when they were on clearance. I also purchase Valentine’s Day coloring books (in Feb since her birthday was March) that featured Minnie on the cover from Walgreens (I paid about $.50 each). And finally I purchased stickers on eBay. I used my cricut machine to cut out Mouse Ears and printed the kids names on the ears. The “name tags” were placed on the bags with rubber cement and so the moms could take them off the bags and use them as door name tags at home (and about 1/2 of the moms did so!)
Since people keep asking… I think I really need to write up a post about this 🙂 Hope this helps. Have fun making the ears!
Super cute ears!! I was looking around the web to buy some one for Halloween and then for her 3rd birthday((Nov.)). But looks like I will be making my own! Did you do a Minnie Mouse cake? I was planning on making one, but I cannot find any Minnie Mouse figurines. ((the cake was going to be 3 tiers pink and white poka-dots fondant with Minnie Mouse on top)) Thanks for posting this!!!
I LOVE This!!! Thank you so much for posting this! Every thing else i’ve found was super cheap looking and i love the whole “homemade” aspect!!! Thank you Thank you!
Thank you for sharing this online! I need them for tonight for a Fall Fair costume event. We’ve had the Minnie dress for a while now, my daughter has been using it as dress up. But now she wants to be Minnie for Halloween and it is just not a complete costume without the ears. All the other searches had me buying them online. Wouldn’t get them in time for tonight! My mom told me to do it with felt, but I never would have thought to do it like you did. Thanks for saving the night!
thank you!!!!
Thank you sooo much for posting this! Couldn’t have made it any easier. My daughter’s ears turned out great. =)
wow this tutorial is perfect!! i’ve been stressing about how to make ears for my daughters minnie halloween costume. thank you for sharing!!
Thank you so much for posting this and the other great stuff on your blog! I’m excited to try this out (looks so fun, and I only need one for now) and be Minnie Mouse for Halloween. Your blog is also reassuring and energizing for a mom-to-be!
Hi there.
I came upon this post, because I lost my mouse ears and wanted to dress up for Halloween as Minnie. Is it ok if I link your tutorial in my blog?
xo
katy
What a lifesaver. My daughter left her Minnie Mouse ears at school for the costume parade and Halloween is this weekend!!! So I found your tutorial, went to Hobby Lobby and tried my Home Ec skills. It didn’t even take long.I’m happy and more confident in my creativity, but more important my daughter is happy and I didn’t have to go out and purchase another costume for ears!!!!
Thanks.
Great tips for making Minnie Mouse ears. I made them for my toddler (almost 2) for Halloween (2010). She was adorable. My sister bought the costume, but it did not come with ears. This was easy. Yours turned out absolutely great–like from the Disney store! Thanks for sharing it.
I have been searching in the net for instructions on how to make mickey mouse ears! I’m so happy I found your site. My son is going to have a party and his costume is mickey mouse. I can now make an ear for him and for her sister whose going to be winnie. His birthday will be on December 4 so I have more time to make them. Thank you for sharing!
THANKS FOR THE EARS!
Going to a 21st as Minnie Mouse and your ears are FABULOUS!!!
I am planning my daughter’s one party and love this ideas. I am very busy and have no time at all to make these beautiful crafts. If anyone wants to sell their Minnie theme supplies please emal me at brinise@gmail.com Thanks! Nice Jen your idea was son easy to understand..Merry Christmas
This is great! I can’t wait to see all the kids at the party wearing Mickey and Minnie Ears. I was up until midnight making my daughter’s Minnie Mouse invitations and they came out so cute!
Thank you for the post, I’m planning my daughters 1st birthday and even though I know she won’t remember its very important for me to make everything for the party. This is a great start and as said before by far the BEST instructions/idea I hAve seen yet!
This is such a great idea! I’m 15 years old and I’m volunteering to lead a retreat for Jr High kids in my town. Each “small group” at the retreat has their own theme, and mine is Disney. I’m so happy i found this because I was contemplating buying Mickey Mouse hats because I couldn’t find anything cheap. But these look perfectly adequate. Thank you so much! I’ll send you a picture of my group after the retreat!
I just finished making 25 pair of these for my b/g twin’s Mickey and Minnie Mouse party! Very time consuming, but very worth it, they are adorable!
One trick I discovered, I used a can (refried beans was the perfect size) for the 3″ circle shape and instead of tracing onto the foam, I pressed somewhat hard and left a circle imprint – it saved a bunch of time!
Thanks again for the great directions! 🙂
Awesome post and instructions. I made 7 for my daughter’s party tomorrow and they turned out pretty cute. But, man, you were not lying about the hot glue burns. Ouchie! How on earth did you make 30? And, because I was terrible at covering the headbands in the felt, I found black headbands at the dollar store – that went so much better. Overall, I’m so happy I made them. Thanks!!
Thank you very much for the info.
Im planning a minnie mouse party for next saturday but I cant seem to get them right.
I have some questions:
– I cant seem to get the perfect rectangle size. I’ve tried to cut it twice the width of the headbands, but I dont know if it should be the measure of the lenght of the rectangle, or the height of the rectangle.
– I’m havving ALTOS of trouble with the glue. It turns out VERY messy, and I dont know how to avoid this. Did you clean them?
The glue always leaves “string” and the stick to the felt
Can you help me?
Thank you very much
I’m almost halfway through making my Minnie/Mickey Mouse ears and foudn your tutorial SO helpful, THANKS!!! I never would have attempted making 25+ ears for favors if I didn’t come across your post while searching for bulk ears :)I ended up just buying black headbands because the felt I bought wasn’t long enough to cover the whole thing unless I did it in sections and I wasn’t in the mood to do that or purchase additional longer felt.
Thanks again, it’s keeping me busy busy busy but I’m so proud of the outcome!!
Thank you so much for posting this. My daughter is turning 2 this weekend and she has a combined birthday party with her aunt, who is turning 3. My stepmom and I decided to do a Minnie Mouse themed party since we just returned from Disney World and the girls would absolutely love it! I am in charge of the “crafty” decorations/treats, etc. I was so happy to find this “how-to” for the ears, and I had a wonderful time making them. Although, I must say that if I had to make 30 pairs like you I think I would have pulled my hair out! 🙂 I only had to make 5 pairs… and that was about all my sanity could handle! 🙂 It was just a time consuming process, with cutting everything out, etc. Plus I’m a perfectionist so each step had to be just right!
For the people that had issues with the hot glue…I would recommend a “low temp” glue gun. That is what I used and experienced no issues with burning my fingers.
I also made Minnie gift bags, filled with various “treats” like a coloring book, cute $1 sunglasses from Target, stickers and a package of clip hair bows bought on clearance at Michaels after Valentines Day! My last addition to the goodie bags will be Minnie shaped Rice Krispie Treats on a stick… (dipped in chocolate of course!)
Thanks again and I know the ears will be a huge hit at the party. I’m afraid all the adults will wonder where theirs are! 🙂
http://i941.photobucket.com/albums/ad260/millerbrewer/Minnie%20Mouse%20ears%20and%20gift%20bags/DSC09405.jpg
http://i941.photobucket.com/albums/ad260/millerbrewer/Minnie%20Mouse%20ears%20and%20gift%20bags/DSC09403.jpg
perfetto!!! le tue orecchie sono facili e d’ effetto.bravissima :O) .userò il tuo tutorial per il costume per la mia bimba e lascerò link a questo post,ok?
grazie
Thank you for the awesome tutorial. I used it to make 16 ears for my daughter’s birthday party and they turned out GREAT! I saved a ton of money and learned a little in the process. I posted the tutorial on my blog with a link to your site. Thanks again!
This tutorial is awesome! It is so easy to follow and what a good idea! Thanks for this!
I am in the process of making these ears for my daughter’s first birthday party in May. I covered my daughter’s headband in black felt and I found that if you only do about 2 inches at a time you don’t get lumps and bumps which was good:) I used a hard plastic headband for hers that is 1″ thick. I want my daughter’s ears to be a little different than the other party-goers so I’m making the ears out of a sparkly black sheet of foam (I guess it’s a cross between felt and foam?) and they’re turning out nice, I didn’t even really need the foam in the middle because the felt/foam is stiff but I put one thin circle in anyways for the added thickness. I have her ears almost finished but I ran out of glue:( When they’re finished in the next couple of days I’ll post some pics!
Again, thanks for the great tutorial!!!
These are great instructions ! my sadies is coming up in april and the theme is “it takes two” so everyone is going dress up as character couples and my boyfriend and i are micky and mini! So thank you !!!!!!
Hi, just wanted to say that I loved your idea. Excellent instructions, just finished one to try will definatly be making these for my girls party.
Thanks
I loved it! very genius idea, what a creative mind 🙂
I am making 30 also, but i have 2 other helpers so its been really helpful
Stuck in a small hotel room in Holland with ailing 3 year old grandaughter who absolutely had to have some Minnie ears. My answer was some drawing paper stuck onto cardboard with a Prit stick (solid white glue) I had to buy. My GD cut out the cardboard (from a Kleenex box), coloured the cardboard with felt pen and I bought a very cheap Alice band and 1/2 metre (18 inches) of spotty ribbon from a local haberdashery shop for 2€ (about 2$). We used 2 thickness’s of cardboard for each ear and slipped them over the band. The ribbon helped to keep them in place and also stand up. Loads of fun for a slightly sick child and now she won’t take them off.
Hi I’m interested in making these for my daughters 1st birthday for June 4 2011 how much would u charge me to make them for me
This is great, my daughter is dressing up like Antoinette for her 4th grade class,and she needed the ears for the costume of Despereaux’s mother, I may make them just a bit bigger and gray of course, no bow because she will have on a scarf to hopefully help hold the ears in place long enough for the presentation which counts as a test grade. Thank you for this, it is great.
Love these!! I made them for my daughters 2nd birthday!, she is obsessed with Minnie and these will be a hit! I will share a photo after the party. Thanks again. 10 pairs and I did burn my fingers.
this is so incredibly great! thank you so much for sharing! my daughters bday is in may and this is going to save on costs soo much. and homemade is always so much better. thanks again!!
I LOVE THESE!!!! I am SO excited to make these for my littles first B-day! I’m going to make all her sisters and family that comes wear these!!! THANK YOU!!
I LOVE THIS IDEA…I am already in the process of making these for my daughters 1st birthday party…They look so cute and the instructions are great !!! Thank you so much!!!I will post pics very soon!
Love the ears. Best instructions I have found by far. By any chance do you remember how much felt you purchased? I am also making 30 ears and dont want to runn out or over buy.
I wish I did because buying the right amount of fabric is always the hard part… But I don’t. I do know that I overbought! But felt is CHEAP and with a 40% off code… I’d rather over buy.
this are great instructions im doing the mickey mouse theme for my son is turning a year and the boys are going to wear mickey mouse headbands and the girls minnie mouse and love the way you you put the instructions it was really easy to follow thank you
We’re having a Mickey Clubhouse themed party the first weekend in June, and my daughter was begging for Mickey/Minnie ears for her friends. Everything online was either cheap looking or expensive. I am so excited to make these! Thanks so much for posting these awesome instructions!!
I’m having a Minnie Mouse party for my daughter who’s turning three, these minnie ears look great i’m excited to start making them,thank you so much for sharing the tutorial
My son is turning 2 and is having a Mickey Mouse Clubhouse party. I was just at Disneyland and the ears there looked easy to make so I thought I’d research and I found this. Thank you so so much!!
Just had to come on here again and tell you the ears were SO easy and were a HUGE hit!!! Thanks again!
Hi,
I finally finished making 17 of these, long but so worth it! Thank u for posting. I saw in the comments that you were going to post more pics from the party? Did u? I can’t find them if so will you let me know where to look? Thanks so much!
Thanks this post really helped. We are having a Minnie Mouse Luau for my daughter’s first birthday on July 9th and the making of the bows really comes in handy. I will try to post pics once I am finished with everything. Thanks again for posting
omg, thank you!! i’m planning a mickey/minnie themed party at the end of July, and was completely clueless on how to make “ears”. Your creation is the best i’ve seen!!
Ahhh thanks! Glad you like them. My daughter is STILL wearing hers for play more than a year later (so are the neighborhood kids). So they hold up too!
I have twins (boy/girl) and I decided to do a mickie/minnie party on July 16th and I am so excitied to attempt to make these ears hopefully they come out as great as yours did. How many yards of felt did you use?
Unfortunately, I can’t remember how much felt I bought. But you can calculate for what you need. The ears are 3.5 inches each side with about an inch to inch and half in between. So that’s 8 to 8.5 by 3.5 per ear – call it 9 x 4 to have extra (felt is cheap) per ear. (Remember 2 ears per headband.) Then if you are covering headbands, you need to measure the length and width of the headband and add that to your ear calculations and you’ll know how much felt to buy. Good luck!
i really liked the idea and we used it in my little sister birthday every one liked it and had fun wearing it
thank u for this wonderful instruction i really love it and im excited to do it bec. my son is turning to one on july 18 and is having a mickey mouse clubhouse party….
Thanks for posting this! I am making ears for my son and daughters joint mickey/minnie bday party. they turned out great, I can’t wait to show them off at the party!
Thanks so much for your creativity and tutorial! I decided to make 17 pairs of these for my daughter’s upcoming birthday party. I even included the pictures of my attempt and link to your instructions on my party blog so that everyone I know can discover how to make them, too! Thank you!
Glad it was helpful!!!
Thank you so much for posting this!! I can’t wait for my kiddos party to see all the kiddos with the mickey & minnie ears! Thank you so much!!!
These look awesome!!! i’m so excited!! Our dance team has been invited to dance on stage at disney world, and be in the parade down main st, so i was trying to find mouse ears to wear while we were fundraising. what a simple idea, thanks for sharing!!
Good luck to your dance team! That’s so neat!
Thank you Thank you Thank you! For sharing your how to!!!!!
An amazing job and we are going to give it a whirl for my daughter’s 2nd birthday next month!!!!!
Thank you again for sharing!!!! Great job! Blessings!
These are great instructions…very easy to follow. I am having a MM Clubhouse theme for my son’s birthday. I wanted ears for all of the kids but buying MM hats was just out of the question for 20 kids! These are going to be great…on my way to get my supplies and get started!
Good luck – my daughter and her friends still play with the ears almost 18 months after the party!!!
Hi, I bought a chalk pencil just like yours but mine is not outling my felt like yours. Any tips?
Fabric chalk doesn’t mark as well as sidewalk chalk. You kind have to go over it and over it. I tend to make more of choppy lines than a smooth line b/c of this. It seems especially bad on the recycled black felt. Remember, you don’t have to make perfect circles, so little choppy lines around in a circle are ok. Hope this helps 🙂
I just wanted to personally thank you for this fun, easy, thorough minnie mouse ear making instructions! It really helped me alot! I am going to a disney farewell party and I wanted to be Minnie but couldn’t find any minnie mouse ears around! This totally saved me money $$. Not to mention, it is so cute!!!! It’s even cuter that I made it myself! Thanks a bunch.
Here’s a link to the ears I made myself: http://www.flickr.com/photos/66234920@N03/6031784528/in/photostream
THANKS ALOT!!!!!
Ahhhhhh – thanks, you made my day! Your ears turned out great! Have a wonderful party!
Hi ! I love these but don’t have the time to make. would you consider selling them? I would need them this time next week? Let me know how much if so:) Thank you for your consideration.
I am sorry, but unfortunately, I wouldn’t be able to get them to you in time. Sorry!
Hi!
I am planning on making these for my daughter’s second birthday. These are so cute! I was wondering if you used toddler headbands with these or just regular headbands.
Thank you!
Linda
Hi Linda – Good question. I used regular ones, and none of the kids or adults had trouble wearing them. I HIGHLY recommend that you get the ones that are super flexible and don’t break with toddlers 🙂 I bought mine at Publix,a nd they flex every which way, more than a year later my daughter and her friend still ply dress-up with them! Good luck!
Jen – Thanks so much for the information! We don’t have a Publix here so I hope I can find a good deal here for headbands. I found some at the dollar store but they are made entirely out of plastic and probably won’t hold up well.
HI!!!
These Minnie Mouse ears look great!!!… I am having my daughter’s first birthday party and I have been looking everywhere for Minnie mouse ears and decorations, and I finally found exactly what I was looking for. I was just wondering, what other MINNIE MOUSE decorations did u have at your daughter’s birthday party??? I need some ideas.
Thanks:)
LOL – you know, I have been saying for a year+ that I would try to get the rest of the decor pics up! LOL
Ok – I am going to try to get them up ASAP! 🙂
Jen
Please let me know when you finally put them pics up, I can’t wait to see them!!!
Thank You. 🙂
I did it, I finally posted the rest of the pictures 🙂 http://www.thesuburbanmom.com/2011/09/12/minnie-mickey-mouse-birthday-party-decorations-cake-ears-more/
Hello there,
This is so wonderful of you to share this with us my baby boy is turning 1 years old. I do have a quick question on your circle tracer did you use the 3.00 circle or the 3.50 circle? I have the same one:) I was a little confused on the measurements cause you have 3 inches and then 3.5 can you help me please? Thanks so much so excited to make these for his party.
Hi Kristen –
Good luck making them for the party, they were such a hit at mine. I used both. I used the 3 inch for the foam and the 3.5 for the felt – that way the foam was slightly smaller than the felt and there was room to run a line of glue around the edge of the felt circle to seal them shut. Hope this helps. 🙂
Hi Jen! This is an excellent tutorial. We will be attempting this for my daughter’s first birthday party. If I bought black plastic headbands, would it look terrible if it wasn’t covered in felt? Thanks!
Good luck in advance, I am sure they will turn out great! I think black plastic headbands would look fine, and other readers have mentioned going that route too. (It certainly would save a step of work!) I couldn’t find black headbands when I made mine, otherwise I might have gone that way too. Have fun!
i love these! my daugther is turning one next month and i just started them today so far so good mademy first pair 20 more to go!
Hi, I have 2 girls and a boy (triplets) and they are going to turn 2 soon. They will have a mickey & minnie mouse party…Thank you soooo much for posting this online, I started making them and I LOVE them… I know the kids will love them too, thanks 🙂
Jen-
YOU ARE the WOMAN! Thank you so much for this! My daughter is going to be Minnie for Halloween and I cannot find the real mouse ears I had from an old Disney hat. So, I googled Minnie Mouse ears and found your ULTRA inventive way of making lightweight, great looking ears. I especially love your comment, “Since I am always nervous abut cutting fabric and wasting it, I recommend cutting 2 strips that you think will be the right size. Test one and use the other as a pattern for the rest of your strips, adjusting bigger or smaller if needed.” …and the way you decided to shape the felt in order to bend it around the headband and make the ears both attach and stand up! Phenomenal!!! Yeah Jen!!!
Ahhhh shucks 🙂 Thanks! Enjoy!
Jen
Thanks so much for posting this! I am going to attempt them for my daughter’s 2nd birthday! I had been looking for Minnie Mouse ears but all the decent ones were so expensive & all the others looked so cheap & flimsy…I would love to know what decorations you used for your little girl’s party.
I finally did it – I finally posted the rest of the pictures!!!! Enjoy and good luck! http://www.thesuburbanmom.com/2011/09/12/minnie-mickey-mouse-birthday-party-decorations-cake-ears-more/
My daugther is turning one this september, woul dyou recoomend these for her birthday party. I wanted to make some but didnt know if she was too young..
I guess the question is whether or not she will wear a headband. If not, no way she will wear these. If so, maybe, but they will be kind of heavy for a little one. (I am trying to remember my daughter at 1… she might have worn them for a picture or two, but not long term.) That said, if there will be older kids (or willing adults) it could still be fun to have them! Hope that helps!
So excited to be making the Minnie Mouse ears!! We are going to Mickey and Minnie on Ice!! What a great way to celebrate. We have 16 total so we will be rocking them out thanks to your instructions!
Oh what a fun place to wear them! We just went to Princesses on Ice!!!
Thanks Jen for this great tutorial. I just got finished making 8 Mickey Mouse ears. They were a bit more work than I had hoped for, but I was very happy at the end and felt that all the hard work was worth the final product. It’s a bit tricky doing a very clean job with the hot glue gun work around the headband. I tried to cover my messy glue stains with using a black marker. You’re right about using a whole lot of hot glue; I had to make another run to the craft store for more glue sticks.
I can’t wait to see the kid’s reactions to these ears at my daughter’s 2nd birthday! Thanks again for your detailed post.
Raman
I am glad you are happy with the final product! Happy birthday to your daughter!!!
Thank you so much for sharing . We will post after ….
Thank you so much for these instructions. They turned out great! I will be making these ears to complete my daughter’s Minnie Mouse costume for Halloween!
Thank you so much for posting this! Like someone else said, everything online was cheap looking or very expensive! My b/g twins are turning 1 next month and obviously, our theme is mickey/minnie mouse, I’m so excited their little friends can have minnie/mickey ears too! 🙂 Your daughter is adorable!
You are most welcome. Congrats on the milestone birthday!
Hey Jen – awesome post!!! I’m planning to make these for my daughter’s 2nd birthday party next weekend. I better get started quick! Question for you – did you buy children’s sized headbands, or are they adult sized? I think I bought the same kind that you have and I noticed they are a big big for my daughter’s head. Did they stay on the kids heads OK?
I bought the adult ones. I REALLY wanted to make sure I got the flexible ones that the kids could play without worrying about them snapping, and I was only able to find them in adult size. None of the kids seemed to have trouble keeping them on. I will admit that some were bigger than others (mine came nestled, so the ones on the outside had been stretched more than the ones on the inside), but I put them all out the same and no one seemed to have any trouble. (Remember the fabric will take up space and will make them smaller)
Good luck!
Thanks for this awesome guide. Me and my wife was looking for Minnie mouse ears at the mall yesterday for my daughter’s first birthday party next month. Unfortunately we can’t find any. You are God sent.
–Erik from the Philippines. 🙂
🙂 You made my day, thanks for taking the time… Happy Birthday to your little one!
Thank you soooo much for this post, my daughter turns 5 in December and I’ve been searching everywhere for mickey/minnie ears, as she is absolutely obsessed with Minnie Mouse! Im going to rope my sisters in to help me make these as they look much better than the ones I found!! Leanne (from Cardiff, Wales, UK)
You are welcome! Good luck making them, and be sure to check out the other things I made for the party for more ideas 🙂
WOW!!! yours came out great!!! i really tried doing this but they came out so bad!!! so instead of covering the headband with the black felt i sprayed painted them black and everything else i did the same!! Thank you so much!!! your main idea really help!!!
Oh no! I am sorry your’s didn’t turn out 🙁
Where did you get your Minnie shirt? 🙂 Thanks!
Thank you so much! This was the perfect way to make minnie ears, I would have never come up with my own. I am no expert with hot glue, so mine were a little “gluey” but for a costume for my girls they were perfect 🙂
“Gluey” 🙂 I am sure they were great!!!!
Your idea is a good one…..Thanks
Thank you for posting this! My baby girl is going to be Minnie Mouse for halloween and I’m pretty sure we’ll have a Mickey Mouse Clubhouse party for her 1st birthday in February. Can’t wait to make these! Thanks again!
You are most welcome! Good luck!
I just wanted to add that you can buy a circle cutter at Joann’s, probably Michaels too in the scrapbooking section. It has adjustable sizes and you just push down and spin the cutting part around. It cuts felt, foam, whatever all the same size. Sooo much easier than cutting out circles 🙂
Good tip! Thanks!
Thank you so much for a brilliant page – we are making Pudsey hairbands at Brownies for Children in Need. I’m not particularly “crafty” but like to do a good job so that all the girls are pleased.
Thanks so much for posting this! I am actaully going to make these for my sister’s bridal shower. She is honeymooning in Disney and I just think everyone at her shower would love these!
Ahhhh – so cute!!! What a nice sister!
this rock
Your are THE BEST! I will try it! I love it! Do you also, speak Spanish? I do! and I am also a mother of two girls, Sophia, she will be 7 in June and Nicole. She will be 5 in Dec 7! and we are planning her Minnie and Mickey birthday party in our home. Therefore, I will be making lots of ears!!!! thanks to YOU!!!! GREAT! que bueno! Me encantaaaaa!!! I am from Argentina and I live in Baton Rouge, LA for the last 7 years.
GRACIAS! thanks!
carina giusti
Hi, love them… Would you consider making and selling to me? I would need them for second week in Feb. 2012 around 30 Minnie and 20 Mickey? If so, how much?
We made these for my daughters Minnie themed party in December and they were fantastic, everyone loved them and we also had Mickey and Minnie as guests (via hired costumes) which my little girl absolutely loved and was convinced were the real Mickey/Minnie all the way from Florida, bless her. Thank you sooo much for putting these instructions up, they turned out amazing!!!!
I am so glad they were a hit! And I am sure the “real” Minnie & Mickey were a hit too. I love that idea 🙂
I am a planner, my daughter turns 2 in April. She is all about Mickey and Minnie that I thought a party like this would be awesome!! Thank you for showing pictures and a great guide. I look forward to making these and seeing everyone wear them.
Do you have any idea how to put names on them?
Thank you so much for this!! I look forward to learning more from your ideas.
I had not thought about putting names on the ears. They aren’t very big, so if you had a long name it would be tricky. The only idea I can think of that would fit for sure is embroidery, but I am not that talented. Of course, puffy paint is always an option…
Would you consider making these and selling them. I dont need many. I need 3 girl and 4 boy. Im just not very crafty! Lol!
Sorry Melissa – At this time I am busy crafting for my daughter’s next birthday bash! But they really are simple to make, you don’t have to be crafty, just follow the steps. Good luck!
Thanks for sharing this idea! 🙂
You’re such a great mom! How adorable are these ears?!
🙂 Thanks!
could you not just use a black headband instead of covering them with felt? (as long as they were made of material that glue would stick to?)
Yes. You could. Since I was making them for little ones, it was very important to me to be able to use flexible headbands that could bend but would not break. I could only find those in colors, so I covered them. But use, you could use black headbands and skip the step of covering them. Have fun!
OMG!!!! Thank you so much for sharing the ideas!!!! I loved!!! You did a great job!!!!
Thank you SO much for the tutorial! I am trying to find ears on headbands that I can use to take some cheesy wedding photos when I get married on the Disney Dream in April, and cannot find what I have in mind, so using your guide, I’m going to make my own bride and groom ears! Thank you again for sharing your creativity, you definitely just made my day! 😀
You are welcome. Congrats on your up coming wedding. I am dying to go on a trip on the Disney Dream, have a wonderful time!
You rock!!! Thanks for sharing!
Thank you so much! I Can’t wait to make Minnie & Mickey ears for my daughter Olivia, who is turning 2 in April. I guess i should start cutting away!!!
Love these headbands and I hope I can make them! Just curious…Did you make your little girls shirt too??? I ahve been searching for cute outfits of minnie for her party…nothing catching my eye! Thanks again for the great ideas!
Hi Tammy – I JUST made a video tutorial to make it even easier to help people make the headbands. (I hope to add it to the post by next week.) I didn’t make the shirt, but it was made by my friend who has a little home business. The shirt came with the bows on it (Gymboree), but I am sure Crissi could add bows like it. 🙂
I love your ears and am trying to make them for my son’s first birthday party but I am having trouble printing the template. Can you help me at all? When I right click on the picture and click print it ends up printing your whole blog post instead of the template. I tried to download the template to my desktop and when I went to open it my internet explorer just opened your blog page back up.
Hi Sarah – Sorry about the trouble. I just added that template this week, and I see the problem. I changed the file type, so the new file should prevent that issue. Please use the download link again. Also, I am adding a video tutorial to the page now too, so that should help even more! Good luck with your ears. Let me know if you still have problems.
Jen
So fun!! Thanks for sharing, they are adorable.
My daughter if turning one In March I’m making her Minnie Mouse theme I was going to buy the Mickey ears and just and bows to them but they look to cheap I loved the way yours came out so i think I’m just going to make them since they look so easy to make i need about 30 as well i still have 15 days i think i will go get all my supplies tomorrow cant wait to start and since i already have bows made one step less ….
Thank you I hope that it docent take me that long ….
Good luck.
I am in the middle of planning a Minnie Mouse party for my little girl at the moment…..What kinds of other things did you do for your party. I have 2 parties back to back and am stumped on ideas 🙂
We didn’t do any games because it was for a 2 year old, but you can see all the other decorations and goodie bags here – http://www.thesuburbanmom.com/2011/09/12/minnie-mickey-mouse-birthday-party-decorations-cake-ears-more. Have fun!
thank you so much!!!!!
hi there!! i LOVE the headbands!! my daughter is turning 1 in july and i am def thinking about making these! how much do you think it cost for the entire project? i found some headbands online for $1 apiece, but these are WAY cuter!! love all the ideas!! thanks for the help!
The price all depends on how many you are making and how many things you already have (like do you have to buy a glue?). After the basic supplies, the most expensive part is the headbands, but if you can find those cheap everything else is very cheap. For example, you can buy a sheet of felt for $.99 and a sheet of foam for $.99 and you can make 2-3 from that. If you are making more, you can buy felt by the yard (I made 30 from a yard) for just a couple dollars and foam by the value pack. I made 30 pairs, and all total I paid less than $1 a paid, but I got free headbands and had everything but foam, felt an ribbon on hand. Hope that helps.
Thanks for this idea my daughter is turning 2 and were doing minnie mouse theme. im “altering” it a bit though and just wanted to share the tip with your users. I am making the ears exactly like u said but will be making bows and putting them on alligator clips(i make bows as a side business so i have all the stuff already) and then will have ears in one bucket and bows in another and if people want minnie ears then can attach a bow to one of the ears with the alligator clip and if they dont want a bow then they just grab the ears. HTH 🙂
I can’t get your ear template to download the file, all it’s doing it trying to install something and not open it. Help please 🙂
Hi Crystal – The file is a zip file, so your computer should first try to download the folder. Next when you open the folder, it is an Adobe PDF. If you don’t have an Adobe PDF reader installed on your computer you will need to download it. (I am guessing that’s what it is trying to download.) The Adobe Reader is safe and free. You can download it directly here – http://get.adobe.com/reader/. Hope this helps!
My daughter is turning 4 and we are having her first kids party next weekend. Thought abut buying ears for the kids (so far only 5 kids total) but found this sight after searching for DIY Minnie ears. Have already bought the supplies and hope to get started tomorrow. Cannot wait to see how they come out.
Thanks for posting this! I was going to buy them from Etsy, but wasn’t a big fan of any of them. I love these.
Just a tip for everyone, I found black glittery foam at Hobby Lobby, which eliminated the need for the felt and cut out a step with the added bling of glitter. I also found black satin headbands at Hobby Lobby for a reasonable price and cut out that whole step too.
Thanks again!
OMG!!! How fun is this??? Okay, so where do I get toddler sized headbands??? I need about 30? Help help
I didn’t use toddler headbands, I just used regular headbands. It was my daughter’s 2nd birthday, so the kids were 2-3 years old and it wasn’t a problem.
I dont have a Publix near me. What brand did you use?
I am pretty sure they were Goodie.
ohhh, just regular goodie headbands!!! Thank you so much for sharing!! My daughter is turning two as well, and I am soooo in love with these head bands!! I will attempt to make them!
Good luck! 🙂
Thank you so much for sharing!
I am making a buch of these for my son’s 2nd Birthday Party.
I am sure the kids will love it.
All the best
Thanks for the tutorial- I will be making these for the Forget-Me-Not’s at my church-I co-host a luncheon for the widows of our church every other month. In August we always play croquet and ‘travel’ somewhere. This year we will be traveling to Disney World! Looking forward to making these for our very special Mouseketeers!
Can or if Stiffened felt is used the foam is no longer needed correct? but can still use ear template? found 12″x18″ (felt)and they feel rather stiff/sturdy.
can stiffened felt be used? if used is foam still needed?
it feels rather sturdy perhaps the equivelant of 2 foam circles…
Stiffened felt is great. I definitely stand ups, however, I had a problem getting it to wrap around the headband without buckling. I found it to be too stiff to get the right look. But try it, and let me know what you think.
Thank you so much for this idea! I just finished making 12 ears. Half Mickey, half Minnie for my daughters 1st birthday party. What a wonderful idea.
You are most welcome! Happy 1st birthday baby girl.
Just made these for my daughter’s 2nd birthday! Thank you so much for making the instructions so easy to follow and doing the how-to video! You rock!!! Keep up the wonderful work with this and your kiddos!
Awe thanks 🙂
Thank you!! I am working on making 42 pairs… oh yes, 42! We have a HUGE family and my little one is turning 3. Thanks to a great coupon for hobby lobby I managed to cut the cost of these beauties to just under .82 a piece. WHOOT! We all know it would have cost a fortune to buy enough for everyone.
That’s fantastic!!! Have fun making them, they were such a hit for us!
Lovely thank you so much
Just what I was looking for. I was a mickey mouse club fan as a child & as my partner & are are going to a square dance fancy dress night back to the fifty’s TV. I didn’t want to make the full mickey mouse head. You are a life saver, I will definately make this.Thank you.
Cool idea. But how did you make the ‘foam ears’ stick?
I used foam that had adhesive already on it. 🙂 Then I hot glued them into the felt. If you watch the video, it will walk you through all of the steps.
Hi Jen!! This i a fun and creative idea. It is saving me soooo much money. I am trying to download the template for the ears however it is telling me to register/buy winzap. Shouldn’t it be free?? Help …
You shouldn’t have to buy anything, but it is a zipped file. (Because it is SO big, I “zipped” the file which compresses it so it can be loaded to the website.) Most computers come with an unzipping program, but if you have an older computer you might not have one. You shouldn’t have to buy anything, you should be able to find a free program to unzip it. Try this program to unzip it – http://download.cnet.com/7-Zip/3000-2250_4-10045185.html
Thank you so much! I have watched your video, printed the template and bought the supplies! I am so excited about creating Mickey & Minnie Mouse ears for my daughter’s 3rd birthday! You rock!
Thanks so much for the idea. My daughter is turning one this month. I just started making them and they are coming out great! I am not crafty at all but it was pretty easy to make. I found it the hardest to glue the felt on the band, but not impossible. I would recommend anyone doing Minne and Mickey themes to do this.
Thanks Deseree! Happy birthday to your little one, and I hope your comment encourages other “non crafty” people to give these a try. I think anyone can make them 🙂
Thank goodness that I found this. You did an amazing job and I can’t wait to get my supplies and make my daughter minnie and my son Mickey. I just finished up their outfits for our up coming trip to Disneyland and these will be Adorable!!
My sons 1st birthday is around the corner. Past 3 months I’m looking for ideas to arrange for Mickey & Minnie themed Birthday Party. Mickey ears really a good idea. Thanks for your tips. At last I found it. I’m going to prepare 50 Mickey ears..Wish me luck.
Good luck! You can do it! 🙂
Hi Jen,
These are awesome! I will definitely make these next year. My daughter is having a Very Hungry Caterpillar party theme for her 1st birthday in July and I am providing butterfly wings for the girls and I wanted to make caterpillar antennae for the boys. Your video showed me how to wrap the headbands with the red felt I have. I’m attaching purple pipecleaners and hot gluing pom poms at the end. I was thinking about attaching the very hungry caterpillars eyes as well to make the headband more exciting. Do you have any crafty suggestions? Thanks (and sorry for being off subject)
Hi Veronica – I love that you will use the base I created for another project! And Very Hungry Caterpillar antennae will be uber cute. I am having a hard time visualizing a way to add eyes that wouldn’t get in the way of seeing! LOL. The only thing I can think of is to attach them at the base, but I think they might be more effective as simple antennae. Either way, good luck and happy birthday to your little one! 🙂
Jen
I used your tutorial to make ears for my daughter’s preschool.
i love that easy art and craft i love it!!!
Thanks for sharing your design! I made the ears for my daughter’s party and they were a hit.
I don’t see the template for the ears, where should I be looking for it. I have 12 pairs of ears to make and I love your video.
Hi, you can download them template from this link
Hi, I just wanted to say that I had to make around a hundred of these for my son’s birthday party, and I made half minnie and half mickey. I went to dollar tree and got the headbands, and only paid a dollar for 6 headbands, which made this project pretty inexpensive. If you don’t have a dollartree, then look in your local dollar store for the headbands, which can help you cut down on the cost.
I made this for my son’s party & they are super cute! Thanks for the tutorial!!!!
i’m going to make a pair for my son, w/o the bow, obviously. we’re going to disneyworld for his 1st trip. maybe he won’t want to buy the expensive ears there. thanks so much for sharing.
I love this and am so excited to make the headbands for my daughter’s 2nd birthday. But, I am having ahard time downloading the template. I downloaded the newest version od adobe but my computer wants to open it in word. Help! 🙁
Sorry you’re having trouble with the template. I changed the file from a ZIP to a PDF which you can download here. Let me know how your ears come out!
I love the tips and they look super cute I found a white crayon works so much easier than the white pencil that took too long and could barely see it on the felt. and i taped the ear template so it stronger it kinda laminates it.
I am so thankful I found this is time to make the ears for my daughters 2nd birthday as well. Just curious if you remember about how much felt you bought? I will be making about 30 as well. Did you buy it by the yard or in individual sheets? Thanks so much!!
I bought felt by the yard, not the sheets. It is easier to work with when you are making a lot because I find there is a lot of waste when working with the sheets. (Plus it is cheaper – you get a lot more for your money and can use a 40% off coupon to save on the whole piece!) Unfortunately, I can’t remember how much felt I bought. But you can calculate for what you need. The ears are 3.5 inches each side with about an inch to inch and half in between. So that’s 8 to 8.5 by 3.5 per ear – call it 9 x 4 to have extra (felt is cheap) per ear. (Remember 2 ears per headband.) Then if you are covering headbands, you need to measure the length and width of the headband and add that to your ear calculations and you’ll know how much felt to buy. I hope that helps. However much I bought, I still have some 2 years later! LOL. Good luck!
This was great! I made them for my daughter’s 2nd bday and everyone was amazed I made them myself. They all thought I bought them! And now a year later, my friend asked me to make her some for her son’s Mickey theme bday party. Thank you for posting the instructions! 🙂
Oh yeay! That makes me so happy when I hear that!
I am going to make these for my sports day at school!! I am in the red team and therefore dressing up as Minnie mouse 😀
I can’t wait to see how they look with the rest of my outfit 🙂
Thanks so much
i watched the video and was wondering what link i click on to see the est of the decorations. my daughter will be two in september and i want to do this for her party. thank you for the wonderful idea.
You are welcome. You can find more decoration ideas here – http://www.thesuburbanmom.com/2011/09/12/minnie-mickey-mouse-birthday-party-decorations-cake-ears-more/
Hi,
I just want to know how can i get the discount to Joann’s or Michael’s
Thank you
Both stores regularly have flyers in the Sunday paper with 40% off coupons. You can also sign up for JoAnn’s mailing list to have them mailed to you. From time to time there are printable ones too – I usually post those when they come out 🙂
Hi, what size ribbon did you use for the bow?
Never mind I just saw the size…thanks for the awesome tutorial!!
You’re welcome 🙂 Have fun!
You can buy 4 flexable bands in a pack at Dollar Tree for $1.00
Thank you so much! I just made a pair for my little girl’s first bday! Sooo cute!
Those are amazing you should sell them!
Thanks for the great step by step lesson…gonna try 40 of these for my sons Cross Country team they will be running in Disney next month…I’m going to pirate style them…there team is the pirates…lol…THANK YOU!! Will send pictures when I am finished!! Think some sort of cheap gold earring on one ear…hmmm…to the drawing board I go!!
Liz
Good luck! And I would LOVE to see a picture 🙂
Where do I find the pattern for the ears? I’m having trouble locating it.
In the actual post, click on the words “Download my template for your ears.” The file is a zip file, so your computer should first try to download the folder. Next when you open the folder, it is an Adobe PDF. If you don’t have an Adobe PDF reader installed on your computer you will need to download it. (I am guessing that’s what it is trying to download.) The Adobe Reader is safe and free. You can download it directly here – http://get.adobe.com/reader/. Hope this helps!
Joann now has an app. It will store current coupons for you! And Michael’s has a customer rewards card now that also gives discounts and coupons.
Thanks for the step by step on the mouse ears!
Kim – I did not know about the JoAnns app. That might be the highlight of my day! I am off to go look into both of those programs. Thanks for the tip!
Enjoy the ears 🙂
thank you for the tutorial! How many yards of felt did you purchase and for how many headbands did you make?
Unfortunately, I can’t remember how much felt I bought. (That’s what happens when you make something and then decide months later that you should share your creation with the world.) But you can calculate for what you need. The ears are 3.5 inches each side with about an inch to inch and half in between. So that’s 8 to 8.5 by 3.5 per ear – call it 9 x 4 to have extra (felt is cheap) per ear. (Remember 2 ears per headband.) Then if you are covering headbands, you need to measure the length and width of the headband and add that to your ear calculations and you’ll know how much felt to buy. I hope that helps. However much I bought, I still have some 2 years later! LOL. Good luck!
Just wanted to give you a big THANKS for the Minnie ears tutorial!! My daughter’s high school is having spirit week and tomorrow is Disney character day. I had an idea in my head of how I could make them, but I’m sure this was a much easier way and saved a ton of time, which is nice since she decided at ten o’clock that she would need them in the morning 🙂 Thanks again!!
If you have a smartphone (iphone or android) both stores have an app that you can download with coupons. And remember if one store has a better coupon than the other that week both stores will take each other’s coupons!
thanks for the minnie ears tutorial……
Hey Jen, these are great:) I am going to make about 10-12 pairs for Halloween. I have a home daycare and am going to get all my kids white teeshirts and puff paint their names on them, then make the ears and have the MM CLub for our group party!! I am going to make extras for the siblings:)So happy to find your site, I have looked into buying these, but don’t want to spend $100.00 on 6 of them. the ones that are $2.-$5.00 are cheapo looking:)
You are most welcome. Enjoy!
How many yards of felt did it take to make 30 headbands? I didn’t want to buy too much.
Unfortunately, I can’t remember how much felt I bought (that’s what happens when you make something on a whim and decide later to post about it). But you can calculate for what you need. The ears are 3.5 inches each side with about an inch to inch and half in between. So that’s 8 to 8.5 by 3.5 per ear – call it 9 x 4 to have extra (felt is cheap) per ear. (Remember 2 ears per headband.) Then if you are covering headbands, you need to measure the length and width of the headband and add that to your ear calculations and you’ll know how much felt to buy. I hope that helps. However much I bought, I still have some 2 years later! LOL. Good luck!
thanks so much for this tutorial! my 2 year old’s birthday is coming up and she LOVES mickey’s clubhouse so i am making mickey, minnie, donald, daisy AND goofy hats! all her aunts and uncles are gonna be wearing them! i just have to remember to posts some pics!
again, thanks so much! it definately got my wheels a turnin for her 2nd birthday party!
I made these for my 2 y/o granddaughter to wear with her Minnie Mouse outfit for Halloween. They were super easy. Thanks much for the help.
You’re welcome 🙂
This tutorial is awesome! Thank you, i just made my daughter a set for her Halloween costume. I found some glitter felt, it was a lot stiffer than the traditional felt so i used all the felt i bought instead of buying foam. They came out great. Thanks again.
Fantastic! Hope your daughter loves them!
Thanks for the tutorial! I am going to use it for my dtrs birthday, one questions though, I bought the sticky sided foam as well. U stuck them together and then stuck on side on the felt and glued the other side. Is it possible to stick each foam piece on each side of the felt ears and then but the glue between the foam circle? Just to avoided burning my fingers, or would that not work?
It *might*. I was concerned that the sticky on the foam wouldn’t be strong enough to adhere to the felt – stickers on felt don’t generally hold up long term. I made my ears to last. Two years later, my daughter still wears her ears. It’s worth a try, but I can assure you that it holds up the other way 🙂 Good luck!
One more thing… HOw did u not get glue everywhere! I just finished my first one and when I went to put glue on the loops to secure the ears, I got glue everywhere, sticking to the fabric, their dried on the ears white. So I just colored them in with a sharpie, but am I doing something wrong? I am using a mini glue gun.
What brand of chalk did you use? I bought a dressmakers marking pencil in white and it will not trace on the felt….
I don’t know what brand it is, it is just a dressmakers pencil. I do have to go over it several times and apply some pressure to make it leave a light impression. Try some regular kids chalk if you have any lying around, it will be dustier, but should work. Good luck.
HELLO JEN. JUST WANTED TO THANK YOU FOR SUCH A GREAT TUTORIAL AND FOR SHARING IT WITH ALL OF US. CAN NOT WAIT TO GIVE IT A TRY. 🙂
You are most welcome. Thanks for the note! Have fun. 🙂
Hi!!
I loved your post. We had a Minnie Mouse Theme party for my 2 year old daughter and it was beautiful!!
I did my own post of how to make the Minnie Mouse Ears, as I took a few shortcuts 🙂 and i didn’t forget to mention your post as you were my inspiration 😉
Thanks again for sharing all your beautiful DIY projects.
Thanks so much Mage, I am glad they turned out so well! Saw your little boxes too, cute 🙂
Hi, instead of using a dressmakers pencil, I like to use a thin piece of soap. It works wonderfully on fabric and can be washed out or rub off. Instead of covering the headband with material, my hubby spraypainted it black. It can be done in matt, gloss, glittery, etc. Thanks for the pattern. My little girl just loves Mickey and Minnie.
THIS IS SUCH A GREAT TUTORIAL MADE MY LITTLE GIRL A MINNIE MOUSE HEAD BAND FOR HALLOWEEN AND SHE LOVED IT <3
Jen you rock! Love the tutorial!! Thank you for blessing my life with your site!
🙂 Thank you!!!
Hey Jen, I have a Mac and your pdf file isnt working to open up the template for the ears. Do you know if it only works on pc?? Thanks, they look awesome and trying to make for a family reunion to disneyland.
I got it figured out. Excited to get started. Thanks for your tutorial:)
Glad you got it to work 🙂 Good luck!
Just curious:
about how much did you spend per headband? I am trying to decide cost wise if it would be better if i make them or worth it to just buy them!!! Thanks!!
Using coupons I spent about $1 – $1.50 per set of ears on materials. I can’t remember exactly, but in that range.
Hi like the way you made your minnie ears …but there is an easy way to make them .. the stick on foam ..glue the color sides together , than peel the paper and stick to the black felt. ad glue to seal ears .. Thanks Maria
Those are sooooo cute!! My daughters birthday is in March, and I would love to use those as the “party hats.” Have you thought about selling them?
Thanks so much. Unfortunately, I just don’t have the time. If only there were more hours in the day I’d love to 🙂
Hi, are you willing to sell these??? They are toooooo CUTE!
Sorry. At this time, I do not have the time to make them. Thank you so much though. If there were more hours in the day, I have thought about it 🙂
I am soooo excited about making these. I found super thick foam paper so I need only half as many to cut out! Yay but I will post photos when they are finished. I’m stoked and so are my twin daughters who turn 4yrs old tomorrow. Thaaaaannnk you so much for this great idea.
You are most welcome. Have fun & Happy Birthday to your girls!
Thanks so much for the pattern and info. I am going to a Red Hat Event with a Disney theme. I will be making these in Red. I will send a pick of us at the event. Again thanks.
I love that, and I would love to see pictures 🙂 Have fun!
Hi I would like to know how thick were ur foam sheets. Cuz I have 13.9 cm n I wanted to know should I double them up
I am going to a Red Hat Event so I will be making these in red. Thanks so much
I love that!!!
thank you for posting, i’m using this for my twin’s birthday- great tutorial!
You are welcome! Have fun.
Love this idea. My daughter is turning 2 next month and since before her first birthday, I’ve been planning on doing Minnie Mouse for her 2nd. I made my first ears tonight to put in her invites. I’ve noticed though, that you can really see the foam. It sticks out quite a bit. How did you make your’s look so smooth? It is my first one, so maybe after I do more, I’ll be able to make them look much better. Thank you so much for the “how to”. I’m excited about these.
Hi Jana – I am so excited for you! These originated from my little girl’s 2nd birthday, and she will be 5 next month (tear). I am not sure what you mean that you can see the foam? Do you mean that you felt is shear and you see the color or that you see the outline? Either way, my best guess is that you might have very thin felt. This is something I never experienced, so I am not really sure. You might have to play with it, if the felt is too thin, you might need to double up… Good luck!
The felt is thin, you can see the outline of the foam. When I went to buy the felt, the didn’t have any black by the yard, so I bought the sheets. Thank you!
Hi! I just wanted to say a huge thank you for your tutorial! My high school cheerleading team is going to nationals in Disney World next week and I made these for all 30 of us! It was so helpful I can’t thank you enough!!
CONGRATS on nationals & good luck! I bet you will all look adorable in your ears. I’d love to see a picture, if you care to share after the event.
I am going to attempt my first one using the template and tutorial! I’ll let you know how they turn out as I’m not that crafty and have never used a glue gun. Thanks for posting!
This is a great tutorial! I just had a question…I bought the 2mm thick foam sheets and doubling them seems too thick. I was just wondering how thick your foam sheets were. If they were also 2mm and you doubled them, I’ll stick with it! Thanks!
Wow this is awesome! I’m doing this for two kids 13 months apart the boy loves mickey and the girl loves minnie. 🙂 how many pack of felt did you buy in total?
Hi Yessy – I didn’t buy packs, I bought felt by the yard. If you scroll up through the comments, you will see that I calculated the felt needed for other commenters.
I just made my 1st pair of ears, and I bought sheets of self-adhesive felt at JoAnn’s. It worked like a dream!! No need to mess with hot glue, just stick the foam circles in the middle (not self-adhesive, just regular foam), position the center of the rectangular part of the ear on the headband where you want it and it will stick and then fold the rest of the ear up, match the two circles together and press it to stick! It’s great! I’m not sure. The brand was Stick’rz felt and it was a little more expensive than just plain felt, of course, but it is worth it not to have to mess with hot glue! It’s extremely sticky and comes in 9 x12 sheets. You can fit 3 ear,on a sheet, so you can make 1 and a half pairs with each sheet.
This blog was… how do you say it? Relevant!! Finally I have found something which helped me.
Appreciate it!
We made 60 mickey ears for my son’s first birthday with the help of this tutorial. I used a circle city to cut the foam. We cut rectangles and glued the felt to the down and cut around it. We got clean finish and perfect circles. It was fast easy and very clean. Also for the headbands my friend sew straight line pockets and we just cut it close to the stitch. It saved us some hot glue woes.
A cool fun project
Jen, You saved my life last night! my 17 yr old, junior in high school told me at 9:15 that today was ‘Dress up like a cartoon character’ TODAY! I stayed up till almost 1am after he ran to WalMart for red shorts and head bands. I used some heavy fusible interfacing, but YOUR pattern. I got a HUG (that NEVER Happens!) and a promise for pictures (THAT REALLY NEVER HAPPENS!) I will post the picture on my blog later and email you the link. thank you Thank you THANK YOU!
Awe!!! You are welcome! I am so glad I could help. I hope your Mickey Mouse has a great day. Can’t wait to see pictures.
I used this template to make Minnie and Mickey ears for my daughter’s 1st birthday, and they came out great! I am not usually a crafty person, but I was very proud of myself after doing them. Of course, I did have help from family!! We made over fifty ears!! The majority were minnie. We used a thinner headband, and just to save time and felt, since the headbands were all black, we did not wrap them. However, the actual ears we did in felt. We also used a slightly thinner ribbon for the bows, because it was what I could find that was hot pink with white polka dots. That worked out perfectly. Being that I was “Momma Minnie”, my ribbon was hot pink and black zebra print. I also did my own centerpieces, which were very nice!! Thanks for the very precise tutorial!! 😉
I am so glad to have inspired you! 50 – wow! Glad you had help 🙂
Thank You so Much! Your Tutorial was so helpful!
You can’t beat classic Disney! These are awesome – I’ll keep them in mind for my daughter when she gets a bit older, she’ll hopefully enjoy them! Long live Mickey and Minnie 🙂
Thank You SOOOOOOO much!!!! I was alittle nervous about trying to find all of the things I needed to make a successful party for my soon to be 2 year old little girl. However, after finding you website… I can honestly say that this party will be great!! And I know her class will love the ears! Thank you so much!
Thank you so much for this tutorial. it helped me to create mickey and Minnie mouse ears for my daughter’s birthday party that is this Sunday. thanks you again.
is so beautifulI wish I could make this my daughter
umm can you just sell the head bands?
I wanted to know if I’m gonna make 20 ears how many sheets of felt do i need. At michaels it’s a 9×12 sheet and would i be okay with just 1 pack of foam or do i need 2
I made 15 ears for my daughters birthday party this weekend. I bought just over a yard of black felt and a pack of 5 sheets of foam. I had LOTS of extra felt (I overcompensated how much I needed in fear of making a mistake) and and extra sheet of foam. I believe I fit 12 circles to a sheet. So, for 20 – you should be good with about the same amount.
How much felt did and yards or ribbon did you buy to make the 30 ears?
Just made 9 pairs of these ears 6 Minnie and 3 Mickey for myself and my coworkers for a work costume. (We are day camp leaders) We were the Mickey Mouse club. I found I needed a 9x 12 piece of felt PER set of ears, 9 pairs probably cost between $25 and $30 but I bought all the stuff last minute so I probably didn’t get the best deals. Anyways just wanted to answer some questions I saw above and give you a HUGE thank you! Such a perfect and easy tutorial!
Yeah – felt sheets are the most expensive way to go. It is much cheaper to buy felt by the yard. (It is like $3 per yard!) I am sure your ears turned out super cute!!!
Thank you so much for this tutorial. It was great. My husband helped me make the ears and they turned out wonderfully.
Does anyone have any ideas for a seaseme street party for a two year old? I seen an idea about the party hats and I have an idea to decorate balloons as the character faces as well. But thats all I have for now so any ideas would help. Also I seen another idea for the party fruit and veggie trays made to look like character faces.
Some lady is using your photo of all the headbands lined up on her etsy shop… {Link removed}
Thank you for the heads up!!!
Thank you so much!! I am going to Disney Florida next month and wanted to make a Minnie Mouse outfit to wear to the No So Scarey Halloween Party. These ears were easy to make with your instructions and look fabulous!! Me and my daughter had great fun making them.
Love this, so cute!
I made two pairs of these, for my husband and I, for a Halloween party tomorrow night. We’re going as Cubby and Sherry from The Mickey Mouse Club. Thank you for the patterns and very helpful tutorial.
hi can you save me how to make the ears from Mickey Mouse
Some cost saving tips I found… at the Dollar Store they have 2 packs of headbands for a $1 and tons of foam crafts to make the inside circles for $1. And Hobby Lobby has 8.5 x 11″ felt sheets 4 for $1 and then you can use their 40% coupon on that (look it up on your phone at hobbylobby.com). Hobby lobby also has thick foam sheets (5mm) that are 12″ x18″ for $1.27 – I was able to make 24 inner circles (enough for 12 ears. So in total I spent about $.75 EACH!! Thanks for the instructions. I hope my tips can help some one save some money. : )
FANTASTIC tips – thanks for sharing 🙂
Hi! I just wanted to let you know that I made a Christmas version of your Mickey/Minnie Mouse Ears and am sharing it on my blog today. I linked back to your post for a full tutorial and just mentioned the changes I made. Thanks! My niece and nephews are enjoying their ears at Disneyland right now!
Just made these four daughters birthday! I embroidered an initial in one ear. Wanted to share a pic but don’t see a place. Thanks so much for the template!
I would LOVE to see a picture. That sounds adorable!!! You can email it to me or post it to my FB page. 🙂
Im making 100 50 minnie 50 mickey how much material of each would i need and where can i get the headbands for cheap? Plzz help need for next weekend.
Oh boy, you have your work cut out. I found my headbands at our grocery store, but people have commented that they found the same ones at the Dollar Store. If you look through the comments, I have calculated the felt for various people. I think the most I calculated was for 30 pairs, but you can build off that. Have a blast!!!
Here, this might help… The ears are 3.5 inches each side with about an inch to inch and half in between. So that’s 8 to 8.5 by 3.5 per ear – call it 9 x 4 to have extra (felt is cheap) per ear. (Remember 2 ears per headband.) Then if you are covering headbands, you need to measure the length and width of the headband and add that to your ear calculations and you’ll know how much felt to buy. I hope that helps.
Jen, I’ve been meaning to write this message to you for months! Thank you so much for this amazing tutorial. I used it for the Minnie ears at our Disney Side @ Home Celebration and then again today to make puppy and kitty ears for our MommyParty/PlayDate with The Happy’s. Thank you, thank you, thank you! The hot glue gun was kicking my behind all day today and I can’t feel the tips of my fingers, but it was so worth it. I plan to blog all of my ears soon and will link back to your tutorial and video because it is perfect and has truly made me a headband-ear-a-holic! 🙂
SO glad you loved the tutorial. The inspiration came from Bear ears my mom made for me when I was a little girl (that I still have!), so I love that you are using it to make other animals too! 🙂
Question! What sort of edge to you end up with around the ears after gluing the pieces together? Do you fold a little over the back of the ears, or do you line up the edges completely? Is there potential to fray? I never like working with felt because of that, lol.
Mandy – The good thing about working with felt is that it does not fray — only if you try to tear it. But if you cut clean circles, it won’t fray. I lined up the edges as close as I could, and they stay. My girls still use the ears I made in 2010 and they are in great shape.
what an awesome tutorial! Im making these for my twin girls 2nd birthday right now, any advice on getting the hot glue residue off the felt??? It’s driving me nuts, cant seem to get it off.
Unfortunately, it doesn’t come off 🙁 You can try taking a black Sharpie to it. Good luck!
Thanks so much for this tutorial. These will sure be a hit at my daughter’s 1st birthday party!
Hi Jen
I want to make the headbands for my nephews party! Was wondering… I had already purchased 60 black metal headbands (and was gonna put ribbon on end so it doesn’t scratch the kids) do u think the metal headbands would work ok? They are 1/6″ (4mm) any suggestions would help! Please email me!! Thank you
Hi Meghan – Yes, I think metal would be find. I picked the ones I used b/c they won’t break and they are soft too. But I have used metal for other things (including my Mad Hatter tutorial), you will be fine. Have fun!
Thank you so much for this tutorial. I was able to make 30 ears for $0.50 each, got an email yesterday selling the same thing for $4.99 each!!! Never would’ve thought of this on my own. Can’t wait for everyone to see and take one at my daughter’s 3rd birthday on Sunday. You’re awesome!
Super excited about this! I’m having a Minnie first birthday party for my daughter and plan to blog about the whole thing on http://www.littlelist.com …get ready for a shout out!!
I look forward to seeing it!
Do I’ve to use felt on head band if it’s already black?
No, you don’t have to. I wanted to use the bendable headbands so the little ones wouldn’t break them, and I couldn’t find those in black. But you can skip that step if you use black headbands.
How much felt is needed for 50 head bands & ears
Thank you so much! This is an excellent tutorial for us kinesthetic learners 🙂
You are most welcome! 🙂
These are wonderful! Does the foam stand up well or if your too rough with it does it start to fold/flop over? I’m thinking kids shoving them in a bag or trying to travel with them.
I made these for my daughter’s 2nd birthday, she is 7 now and the ears are still in their dress-up box. They have been beaten up over the last 5 years, but they still stand up straight! They hold up fantastic.
I am super excited to find this site. I am not making headbands but I am making a Minnie Mouse Piggy Bank for my grand daughter and was trying to figure out an easy way to make the ears and bow for the top without buying headbands. Perfect tutorial!! Love the Bow Idea will save me so much time making them for other projects in the future. Thank you so much for posting!!
Such a cute idea! Happy I was able to help 🙂
Love this idea. Will be making for my grandson’s second birthday. Can you tell me how yards of black felt you purchased to make 30 sets of ears?
Hi I started making the ears last night using your template. The foam circles came out way smaller than the felt ears so the first set was floppy. I haven’t made anymore bc I not know if I need to cut out more foam circles just bigger. What do you recommend? Did I make a mistake tracing the template exactly?
You do want the foam circles to be smaller than the felt, this allows you to run hot glue around the edges to seal. The hot glue hardens and should add to the stiffness of your ears too. Don’t forget to double the foam to make it thicker, one layer isn’t thick enough. Beyond that, I am not sure. Did you cut to the inside of the trace lines by chance? Other than those suggestions, I am not sure since I can’t see them. This is the template I used to make mine, so I am not sure. Hope this helps.
Did you use soft felt or stiff felt ?
I used a regular felt. Defiantly not the thinnest I have seen, but not stiff enough to stand on it’s own — that’s what the foam does. Hope that helps.
Making these for my sisters hen do… in Disneyland Paris!! Thanks for great instructions and making my mum believe we could do it with glue….. Anna x